Vim Editor
Learned insert mode (i), saving (:wq),
quitting without saving (:q!), deleting lines (dd),
and undoing (u) through vimtutor and hands-on practice.
Learn to use the Vim and nano text editors to create and edit files directly from the Linux terminal.
Connected via PuTTY (as described in Lab 225). Completed vimtutor lessons 1-3, created and edited a file called helloworld using Vim, and created and edited a file called cloudworld using nano.
Learned insert mode (i), saving (:wq),
quitting without saving (:q!), deleting lines (dd),
and undoing (u) through vimtutor and hands-on practice.
Created and edited a file without needing insert mode.
Saved with Ctrl+O and exited with Ctrl+X.
Detailed record of each task performed during the lab.
vimtutor to start the interactive Vim tutorial.:q!.sudo yum install vim first.
vim helloworld to create a new file called
helloworld.
i to enter insert mode and typed:
Hello World! This is my first file in Linux and I am editing it in Vim!
ESC to exit insert mode and typed :wq
to save and quit.vim helloworld and added a second line:
I learned how to create a file, edit and save them too!
ESC and typed :q! to quit without saving
the second line.:q!).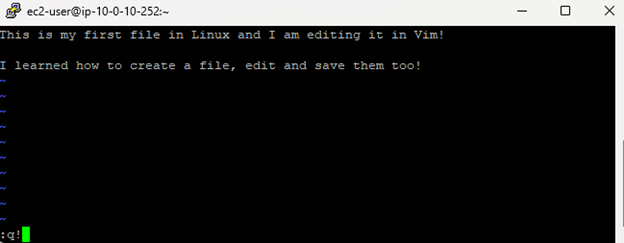
:wq and :q! is critical.
:wq writes (saves) and quits; :q! quits and discards
all unsaved changes.
nano cloudworld to create a new file called
cloudworld.
We are using nano this time! We can simply start typing! No insert mode needed.
Ctrl+O to save, then Enter to confirm
the file name.Ctrl+X to exit nano.nano cloudworld to confirm the content
was saved correctly.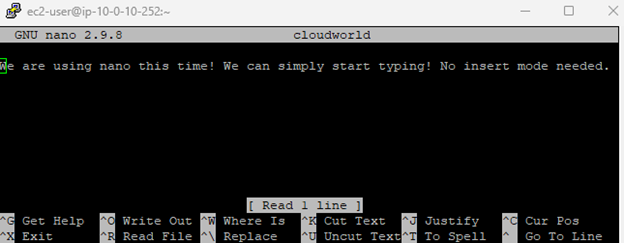
Key commands and shortcuts used in this lab.
vimtutorLaunches the built-in Vim tutorial application.
vimOpens the Vim text editor. Creates a new file if the specified file does not exist.
i : Enter insert mode (start typing)ESC : Exit insert mode (return to command mode):wq : Save changes and quit:q! : Quit without saving:w : Save without quittingdd : Delete the current lineu : Undo the last actionnanoOpens the nano text editor. No insert mode needed; start typing immediately.
Ctrl+O : Save the file (write out)Ctrl+X : Exit nano:wq (save + quit) and
:q! (discard + quit).Both Vim and nano are terminal-based text editors available on Linux. Vim is more powerful but has a steeper learning curve due to its modal editing (insert mode vs. command mode). Nano is simpler and more intuitive for quick edits.
Understanding both editors is important because many Linux servers do not have graphical interfaces, making terminal editors the only option for editing configuration files and scripts.